
Mastering Blue Eyeliner Tattoo Correction: A Step-by-Step Guide
Mastering Blue Eyeliner Tattoo Correction: A Step-by-Step Guide
Blue eyeliner tattoo can be a beautiful addition to one's look, but what if it didn't turn out as expected? In this guide, we'll delve into the art of correcting blue eyeliner tattoos, providing you with valuable insights and techniques to achieve stunning results.
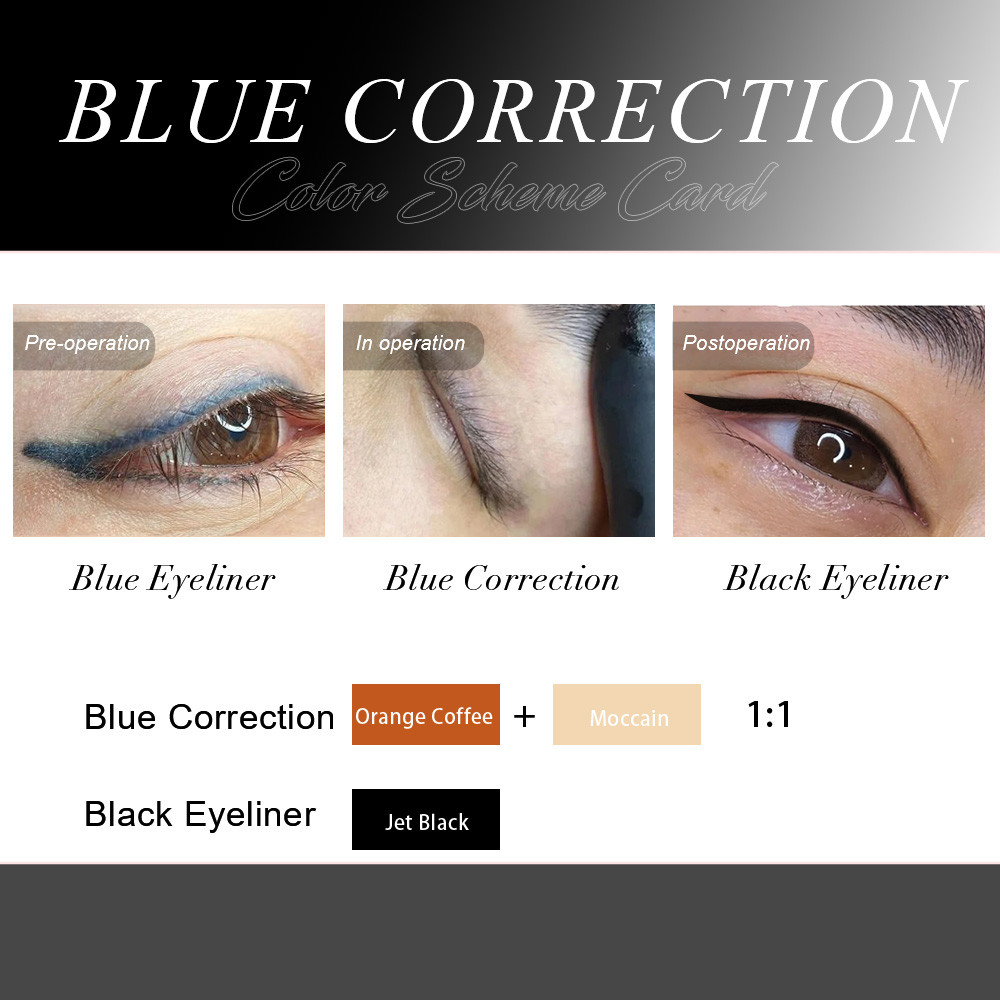
Key Takeaway: Correcting blue eyeliner tattoos requires understanding color theory, proper pigment selection, and precise application technique. With the right approach, even challenging blue pigment can be neutralized into natural-looking results.
Understanding the Challenge
Blue pigment can pose unique challenges during correction. Unlike other PMU pigments that fade gracefully, blue eyeliner pigments often retain their cool undertones, creating an unnatural appearance over time. Understanding why blue pigment behaves differently is the first step toward effective correction.
- Blue pigments have smaller particle sizes that sit deeper in the skin
- Cool-toned pigments are more resistant to natural fading
- Previous correction attempts may have darkened the area
- Skin undertones affect how blue pigment appears over time
Assessing the Existing Tattoo
Before diving into correction techniques, it's crucial to assess the current state of the blue eyeliner tattoo. A thorough evaluation helps determine the best approach for effective correction.
| Assessment Factor | What to Look For | Impact on Correction |
|---|---|---|
| Pigment Saturation | How dense is the blue color? | Higher saturation may require multiple sessions |
| Pigment Depth | How deep was the pigment implanted? | Deeper pigment is harder to correct |
| Color Tone | Is it bright blue, grey-blue, or green-blue? | Different tones need different neutralizing colors |
| Skin Condition | Any scarring, bruising, or sensitivity? | Compromised skin needs extra care |
| Age of Tattoo | How long since the original procedure? | Older tattoos may be easier to correct |
Correction Techniques and Pigment Selection
Color theory is your best friend when correcting blue eyeliner tattoos. The principle is simple: colors opposite each other on the color wheel neutralize each other. Orange and warm-toned pigments are the primary neutralizers for blue pigment.
Recommended Correction Approach:
- Orange-based correctors — Neutralize blue undertones effectively
- Warm brown pigments — Blend with existing blue for natural results
- Skin-toned camouflage — For heavily saturated blue areas
- Layered approach — Apply correction in thin layers rather than one heavy pass
Step-by-Step Correction Process
Step 1: Prepare the Area — Clean the eyeliner area thoroughly with antiseptic solution. Numb if necessary.
Step 2: Select Correction Pigment — Based on your assessment, choose the appropriate correction pigment. For most blue eyeliner cases, a warm orange-brown blend works best.
Step 3: Test Patch — Apply a small amount of correction pigment to a discreet area to see how it interacts with the existing blue pigment.
Step 4: Apply Correction Layer — Using a fine needle configuration (preferably 1RL or 3RL), apply the correction pigment at a shallow depth of 0.5–0.8mm. Work in thin, controlled layers.
Step 5: Blend and Build — Gradually build up color intensity. Allow 4–6 weeks between sessions for the skin to heal and the color to settle.
Step 6: Evaluate and Adjust — After healing, assess the result. Additional sessions may be needed for complete correction.
Aftercare and Healing
Proper aftercare is vital to maximize the effectiveness of the correction procedure. Provide your clients with these essential guidelines:
- Keep the area dry for at least 3 days post-procedure
- Avoid direct sunlight and tanning beds during healing
- Do not pick or scratch the treated area
- Avoid eye makeup for at least 7 days
- Apply prescribed aftercare ointment as directed
- Schedule follow-up appointment in 4–6 weeks
Color Correction Overview
| Existing Color | Neutralizing Color | Expected Result |
|---|---|---|
| Bright Blue | Orange / Warm Brown | Neutral dark brown |
| Grey-Blue | Warm Beige / Peach | Natural grey-brown |
| Green-Blue | Red / Warm Red-Brown | Neutral brown |
| Dark Blue | Orange-Brown / Copper | Warm dark brown |
Frequently Asked Questions
Can blue eyeliner tattoo be completely corrected?
In most cases, blue eyeliner tattoos can be significantly improved, but complete correction may require 2–3 sessions. The depth and saturation of the original pigment, as well as the client's skin type, affect the final outcome.
How long does blue eyeliner correction take to heal?
Initial healing takes about 7–10 days, but the color will continue to settle over 4–6 weeks. The final corrected result should be evaluated after the full healing period before deciding if additional sessions are needed.
What pigment colors neutralize blue eyeliner tattoo?
Orange and warm brown pigments are the primary neutralizers for blue eyeliner tattoos. The exact shade depends on the specific blue tone — bright blue needs orange, grey-blue needs warm beige, and green-blue needs red-brown tones.
Is blue eyeliner correction more difficult than other PMU corrections?
Blue pigment correction can be more challenging because blue particles are often smaller and implanted deeper than other pigments. However, with proper technique, pigment selection, and patient layering, excellent results are achievable.
Final Thoughts
Mastering the art of blue eyeliner tattoo correction opens up new possibilities for your permanent makeup career. With a solid understanding of color theory, careful pigment selection, and precise application technique, you can confidently tackle blue eyeliner correction and deliver exceptional results that leave your clients delighted.
Remember, practice makes perfect! Embrace the journey, refine your technique, and elevate your expertise in the world of permanent makeup. Each correction case is a learning opportunity that will make you a more skilled and versatile PMU artist.
Related Reading
Interested in learning more about PMU correction techniques and pigment knowledge? Check out these related guides: